Skip to content
  • Home
  • Contact
  • About
  • Recipes
  • Uncategorized

Beans+Rahz

  • Home
  • Contact
  • About
  • Recipes
  • Uncategorized

Mozzarella Chicken Meatballs

kathrynrahz's avatar kathrynrahz March 11, 2019

img_5252

I have a general rule here around the Rahz house.

If I cook for you, I love you.

In some way, shape, or form, you have found a place in my heart.

When it comes to my kids, I make them at least try a recipe before they show contempt and make statements like “ok fine. I guess I’m not living here anymore”. (Said by my 3 year old, Lucas).  And then there are the times that I quietly make one of their beloved favorites, because well, I love them.

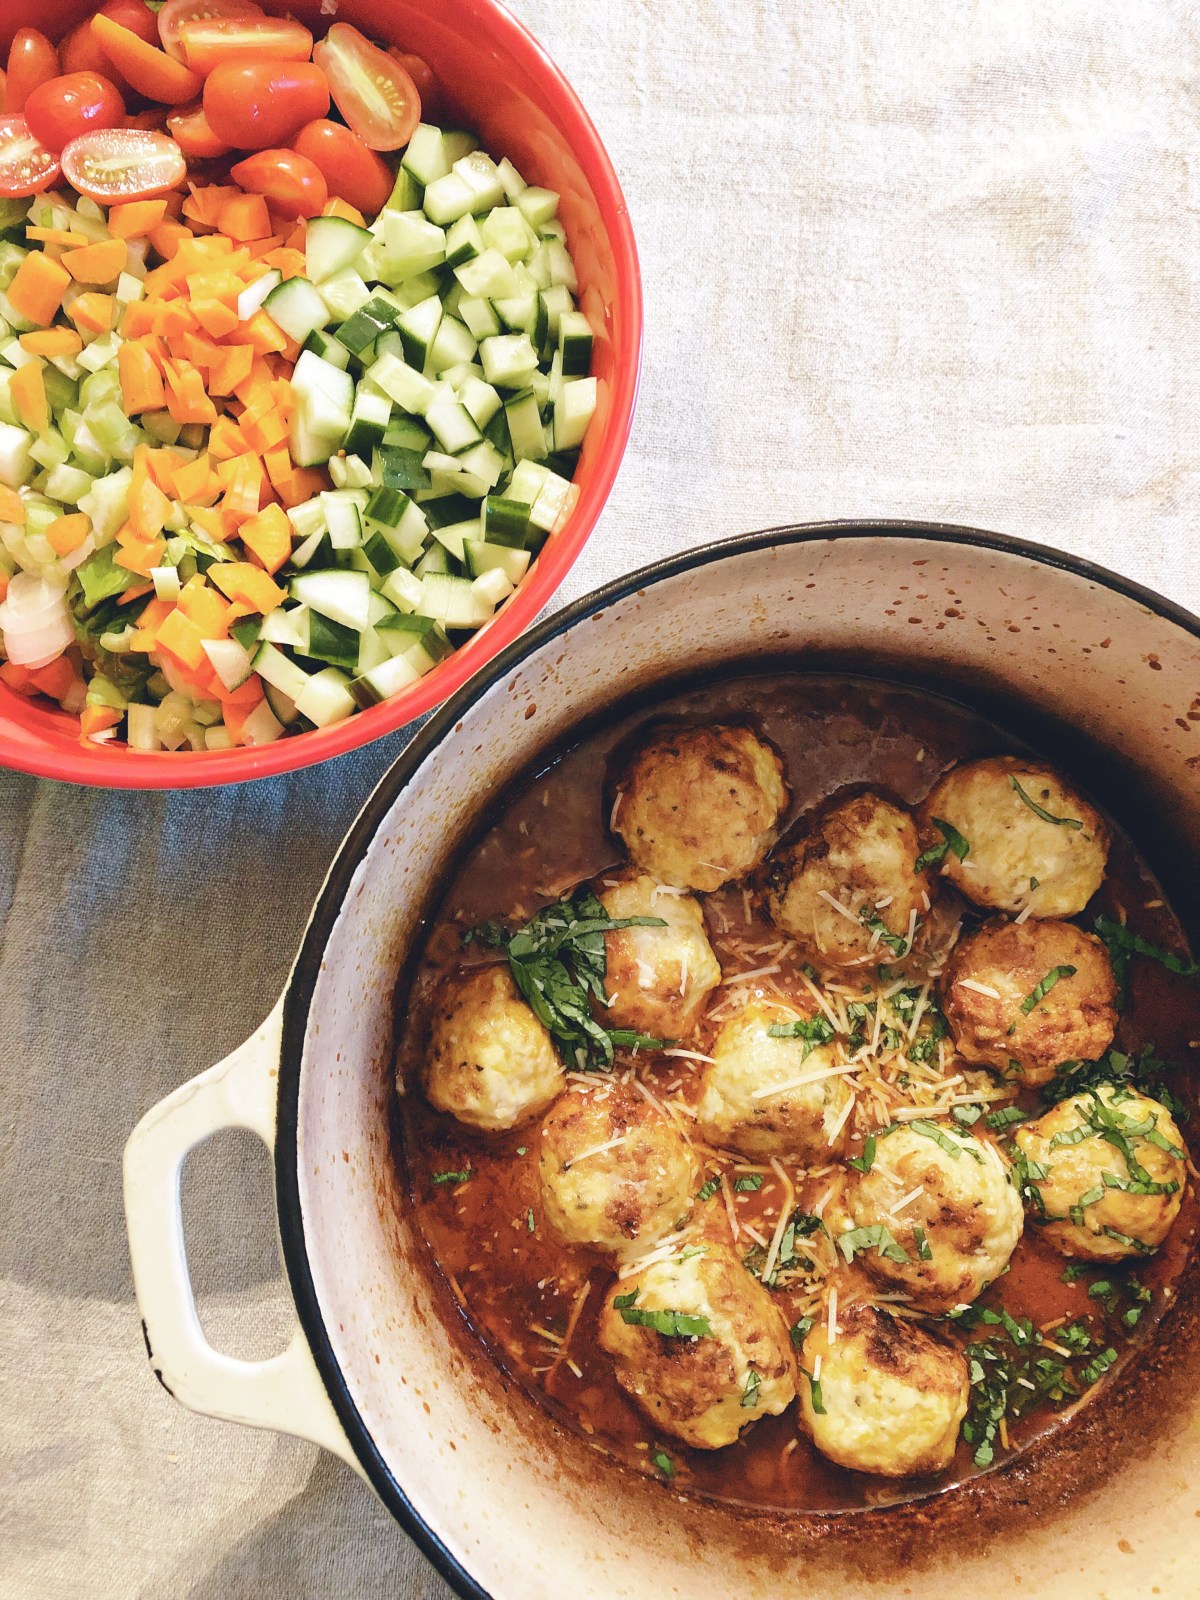
Enter these mozzarella stuffed meatballs. They are made with ground chicken, and very much resemble chicken parmesan. This time, I made them with ground turkey, because Heinen’s had ground turkey on sale for $2.99/lb. For those of us that frequent the meat department (ahem, $52 worth of veal shanks), $2.99 is basically free. And as the executive chef around here, it falls right into my pay grade to make those decisions. Use whichever you like, I think they would be marvelous with chicken sausage as well. I’ve made these meatballs both ways and Grace, Silas, and Lucas smash them like Godzilla taking on Tokyo. I sure love those punks.


Ingredients:

2 lbs. ground chicken or turkey

1 cup shredded parmesan

2/3 cup panko breadcrumbs

4 eggs

1.5 tsp. salt

1.5 tsp pepper

2 tsp. Italian seasoning. I recently purchased this one and it’s great.

pinch of red pepper flakes

flour

small mozzarella balls

splash of red wine

2 jars of marinara sauce. I usually make my own because I’m Ma Ingalls like that, but my favorite store bought one is this one . The pomodoro. YAS.

fresh basil, for garnish


Directions:

  1. In a bowl, mix the meat, parmesan, breadcrumbs, eggs, and seasonings with your hands. Ground chicken and turkey is a little softer than beef, so it may seem too loose to hold a meatball shape. It will be fine, but you can also make this ahead of time and let it chill for a bit before you continue.
  2. Then, take some of the meat mixture out, enough for the size ball you want. We are not precious about this here. Save the tiny and delicate meatballs for Italian wedding soup and go hard in the paint with this recipe. Say it with me, “we like big meatballs and we cannot lie.”  Take a small ball of mozzarella, and form the meat around it, so that you completely cover the cheese. Form it into a ball.
  3. Working in batches, you will make the meatballs, and then roll them in flour, before putting them into your preheated dutch oven, over medium heat, with olive oil. In honor of sharing all of my favorite stuff, here is also my favorite olive oil.  The flour on the outside of the meatball will help give it a nice crust, and also mimic the breading on chicken parmesan.
  4. Once all of your meatballs are done and off to the side, deglaze your pan with a splash of red wine, scraping up all of those crusty bits at the bottom of your dutch oven. Now you will put in your two jars of sauce, and then add all the meatballs back in. Put the lid on your dutch oven, and then put it into a 375 degree oven for about 20 minutes.
  5. You can serve these with pasta, a salad, garlic bread, and they are also excellent alone. I like mine piled on a plate, with a borderline unreasonable amount of parmesan cheese and some fresh basil.
  • Uncategorized

Banana Bread

kathrynrahz's avatar kathrynrahz January 23, 2019

img_6947My kids played me again this week.

I’m onto them now though.

They have been getting a loaf of fresh-baked banana bread once a week.  It started because my two growing barbarians boys would eat one bunch of bananas in a day and a half.  So I assumed that they are a) going through a growth spurt , b)  just hungry and c) that one bunch of bananas is not enough.

So I bought two bunches of bananas the next time I went shopping. And they ate all but three.  So I made a loaf of banana bread. So I went back down to one bunch. And they were gone immediately. So I bought two bunches, and then had to make banana bread again.

I have been getting played completely and I AM HERE FOR IT.  I usually make it right around 230PM so that it comes out of the oven right as their bus is dropping them off.  They have me wrapped around their fingers and I’m not even mad about it.  Ain’t no hood like motherhood.

I am however, considering charging them $12, which is the current going rate for  all of the walnuts I’ve purchased for banana bread production.


Ingredients:

3 super ripe bananas that your kids didn’t eat

1 stick butter, melted

1 tsp. vanilla extract

1/3 cup buttermilk

3 eggs

1 cup sugar

2 cups all-purpose flour

1 tsp. kosher salt

1/2 tsp. baking soda

1/4 tsp. cardamom

2 tsp. baking powder

1/2 tsp. cinnamon

1 cup walnuts, chopped


Directions:

  1. Preheat your oven to 375. Spray a loaf pan with spray, or lightly grease it with melted oil or butter. I also line mine with a strip of parchment, to make it even easier to remove it from the pan.
  2. In a mixing bowl, smash your three ripe bananas. Then add all of the liquid ingredients and mix well.
  3. Put all of the dry ingredients into a bowl, and whisk to combine them. Add the dry ingredients to the bowl with all of the wet ingredients. Right before it is all combined, stir in the walnuts.
  4. Pour the batter into the prepared pan. Bake for about 1 hour, or until a knife inserted into the middle of the loaf comes out clean. I usually let mine cool for about 10 minutes, and then I take it out of the pan to continue cooling, so that it is ready to eat sooner.   WE ARE HUNGRY PEOPLE I’M JUST SAYING.

Enjoy! XO

Kathryn

  • Uncategorized

Chicken Pot Pie

kathrynrahz's avatar kathrynrahz January 20, 2019

img_6910“Ma liked everything on her table to be pretty”  ~Little House in the Big Woods

I jokingly referred to myself as “Ma Ingalls” while I was making this recipe in my Instagram stories, because I made it entirely from scratch, chicken stock and all. I could have just as easily taken a poke at Ina Garten and said ” If you can’t make it to the grocery store in time to shop with all of the little old ladies before a snow storm hits to make your own chicken stock from a whole chicken …boxed chicken stock is fine.”

Ha.  I’m always here for some shade.

However you look at it, chicken pot pie is the ultimate in comfort food. Comfort food is the foundation of genuine happiness.

P.S. That beautiful chevron cutting board in the background was made by my husband and I can’t even. ❤


Ingredients:

For the pie dough:

5 cups all purpose flour

1.5 tsp salt

2 and 3/4 sticks chilled butter, cubed

5 tbsp. vegetable shortening (or lard if you are the REAL Ma Ingalls)

4 tbsp. sugar

8-10 tbsp. ice water

For the pie filling:

the meat from one whole cooked chicken

6 cups chicken stock

1 large onion, diced

4 stalks celery, diced

3 carrots, diced

3 cloves garlic, minced

16 oz. mushrooms, sliced

1 bag frozen peas

seasonings: sage, thyme, s&p


Directions: 

For the dough:

  1. Put the dry ingredients into a bowl and mix to combine.
  2. Add in the shortening and cubed butter, and use a pastry cutter to “cut” the cold butter into the flour mixture.  You want it to be very well combined, so that you don’t see any butter. It will form together, but it is too dry.  Add in the ice water and mix it until it is just combined.
  3. This amount makes enough for two whole pies (top and bottom crust). So you will divide this dough into four pieces, and wrap them in plastic wrap. Chill all four pieces until you need to use them.

For the filling: 

  1. Get your dutch oven going over medium heat, with a two swirls of olive oil, and about 2 tbsp. butter. Sauté the holy trinity of carrots, celery, and onion for a few minutes, until the veggies begin to soften.
  2. Add in the mushrooms and garlic. Continue to cook the mushrooms down, and then add your seasonings. I chose sage and thyme, but rosemary is also another option. Use what you have on hand. Fresh herbs are preferred, but dried herbs are ok too.
  3. Now, you will use about 1/4 cup of flour to make a roux. This is needed so that you end up with a nice, thick, and creamy filling. Cook your roux for about a minute or so, and then add your chicken stock.
  4. Bring the mixture up to a simmer, and let it go for about 15 minutes. It should be the consistency of a cream based soup. Add in your shredded chicken, and frozen peas. Remove it from the heat and check your seasonings. I made my filling a few hours before I was going to assemble my pies, but you could always make your filing the day before as well, to save time.

To assemble:

  1. Preheat your oven to 400 degrees.
  2. Butter or oil your pie pans. I have standard 9″ pie pans. I also prefer glass, because you can look on the bottom as it is baking to ensure your bottom crust is baking properly.
  3. Roll out the bottom crust and press it into the bottom of the pie pan. Repeat for the second pie.
  4. Fill each pie shell with the filling, dividing it between the two.  Now you will roll out the top crusts. Once you have the top crust on,  pinch both the top and bottom shells together. Then you will trim off any excess, but don’t go overboard. You want to still have some left to roll under, to seal it. You can finish your edge however your prefer. I just pinch it in between my fingers and thumb to make a simple ruffle.
  5. Mix together one egg and a bit of cream in a small bowl. Brush this onto each of your pies.  Using a knife, carve a small X into the center of each pie.  You can then put each pie, directly onto the rack, in the oven. Bake for around 1 hour, until golden, and the bottom crust is baked through.
  6. Let the pies rest for about 10 minutes before you cut into them, to give the filling time to “set”.  I cut each of my pies in 8 pieces each. Enjoy!  XO, K


  • Uncategorized

Lamb Ragù

kathrynrahz's avatar kathrynrahz January 14, 2019

You know you are off to a great start to the New Year when you completely forgot to blog your New Year’s Day dinner. Hey, resolutions aren’t for all of us I guess.

I decided that I wanted Ragù because the traditional Pork and Sauerkraut is everything but my jam.  I wanted something meaty, saucy, and heavy.  Enter Ragù.  Ragù is a blanket term for a slow braised, meaty sauce.  I’ve done this before with pork, but I wanted to mix it up for the New Year.  Lamb is delicious, and my favorite butcher carries it year round.

I served it over gnocchi, topped with basil and parmesan and everyone in the house ate it, and loved it.  It’s perfect for a day that you are going to be home, hanging out, basking in the delicious smell that it creates.   It’s the ultimate comfort.


Ingredients:

3 lbs. lamb shoulder, cubed

2 medium onions, diced

4 carrots, fine dice

2 stalks celery, fine dice

12 cloves garlic, minced

4 tbsp. tomato paste

2 cups good red wine (you’ll drink the other two)

2- 28oz. can tomatoes

seasonings: thyme, bay leaves, rosemary, s&p


Directions:

  1. Get your dutch oven going over high heat. Add a few swirls of olive oil. Pat your lamb dry with paper towels, and begin browning the lamb. You will have to do this in batches, and don’t overcrowd your dutch oven. You want that nice, dark crust to form on the pieces of lamb. This act of browning meat to perfection is the Lord’s work.  Trust.
  2. Once your meat is browned and set off to the side on a plate, you will begin sautéing the holy trinity of carrots, celery, and onion.  The French refer to this mix of veggies as “mirepoix”, and the Italians call it “soffrito”.  You will cook these veggies down for more than the standard few minutes, as you want them to caramelize. Now you can add the garlic, and let that go for a few minutes more.  12 cloves might seem like a lot, but we all know I have nothing but love and joy for what may seem like an irrational amount of garlic.
  3. Deglaze your pan with the red wine, scraping up all of those beautiful crusty bits as you do this.  That bottom of the pan is where all the flavor lives.
  4. Add in the tomatoes, tomato paste, and seasonings.  Bring this mixture up to a simmer, and then stick on lid on it, and into the oven it goes. 325 degrees for about 3 hours.  It’s that easy!
  5. When the time is up and your meat is done,  I find that it is easiest to remove the meat to a bowl to shred it, and then add it back into the sauce. This recipe also makes a lot,  so you can cut it in half if you don’t have children going through growth spurts who claim to be dying of starvation every five minutes like mine do.
  6. Check and adjust your seasonings, and you can also go the extra mile and add a bit of heavy cream to your sauce, just to remind your family of how much you really love them, and they really are blessed to have you as the family chef.
  7. I served this with gnocchi, but you can serve it over your noodle of choice. It’s also really delicious scooped straight out of the pot with a piece of crusty bread, or so I’ve heard.  🙂 Kathryn


  • Uncategorized

Chili 101

kathrynrahz's avatar kathrynrahz January 6, 2019


img_6766Keep Calm and Make Chili.

Chili is one of those recipes that I get asked for often.  I can only assume that it’s because the other people my friends have asked for a chili recipe from respond with some crazy stuff.

I try to keep my shade throwing to a minimum, but a friend asked on social media how to make chili. The responses went from questionable (V8) to just downright crazy (a jar of tomato sauce). WUT? Now don’t go getting all in your feelings if you’re one of those people.  Just hear me out.  When you use tomato sauce, or any other pre-made product, you lose all control of your flavor and seasonings.  They are loaded with salt, and tons of other seasonings.  And while it seems easy to open a jar or can, it’s actually easier to just make it from scratch.

Chili should be meaty, flavorful, and most importantly, SIMPLE.  Here is how we do it at the Rahz house. I love the combination of half ground beef, and half hot sausage. To all of my outdoorsy friends, swap out the beef for your ground venison and it’s just as delicious.

This is the most simple, but flavorful chili out there. Promise.


Ingredients:

1 lb. lean ground beef

1 lb. spicy Italian sausage

2 carrots, diced

2 stalks celery, diced

2 medium onions, diced

2 green or red peppers, diced

6 cloves garlic, minced

3 cans kidney beans, drained

2- 28oz. cans diced tomatoes

Hot sauce

Seasonings : chili powder, cumin, paprika, s&p

Toppings: cheddar cheese, cilantro, sour cream


Directions:

  1. Get a dutch oven going over medium heat with some olive oil in it. Sauté the holy trinity of carrots, onion, and celery.  Let those go for a few minutes to soften and then add the green pepper and garlic.
  2. I like to add my seasonings at this point. We are keeping it simple here, so my hands down favorites for chili are : chili powder , cumin, and paprika. As for amounts, that’s truly up to you, and how spicy you like to keep things in your house. I usually use one full small jar of chili powder, 2 tbsp. of cumin, and 1 tbsp. paprika. Salt and pepper is a given here in Beans + Rahz land, you know the rules. Don’t be a punk about it, taste your food as you cook, and it will always be perfect.
  3. Add in your meats, breaking it up as it browns.  It is going to smell like Jesus’s kitchen at this point, and then you know you are on the right track. We can all do things through Christ who strengthens us.  LOL.
  4. Add in your beans and give it a stir. Then add the 2 cans of diced tomatoes, and a few good shakes of hot sauce.  Bring this up to a simmer, and let it go for about an hour or so.  Check your seasonings, and adjust if you need to.
  5. And that’s it! So easy.  I like to top mine with cheddar, sour cream. and cilantro. The Mr. agrees, and he thinks it pairs nicely with Corona and lime.
  6. So there you have it. Thank you to Ryan, who requested a recipe last week and it finally motivated me to blog mine for all of you.  XO, Kathryn
  • Uncategorized

Italian Sausage and Vegetable Soup

kathrynrahz's avatar kathrynrahz December 29, 2018

173972E9-BC7C-4032-BD87-3DB5C101C714If there is Italian sausage in it, my family is eating it. I asked my five year old, Silas, to describe this soup and he said “It’s actually perfect.” 

That’s the equivalent to three Michelin stars I’M JUST SAYING. 

I use mild or sweet Italian sausage because I don’t want to compromise my Michelin rating around here , but this soup would roll up baller with spicy or hot sausage FO SHO.

Spicy or mild, whatever your path, this soup will please your crowd. Aprons on soldiers, go earn those ratings.  


Ingredients:

2 lbs. mild or sweet Italian sausage

1 medium onion, diced

3 carrots, diced

4 stalks celery, diced

4 cloves garlic, minced

1- 28oz. can crushed tomatoes

1 Tbsp. tomato paste

1 cup dry white wine

1- 15 oz. can cannellini beans, drained

64 oz. chicken stock (2 boxes)

8 oz. fresh spinach

1.5 cups cooked small pasta (I used ditalini)

S&P, oregano, red pepper flakes

Parmesan cheese for garnish


Directions:

1. Get a few swirls of olive oil going in the bottom of your dutch oven. Brown your sausage and break it up as you go. Once it’s done, take it out and set it aside on a plate. (And try not to eat it, or is this just me?)

2. Add in the carrots, celery and onion and cook them for a few minutes, until the veggies start to soften. Add in the minced garlic and let it go for another 30 seconds or so.

3. Pour in the white wine. Bring it to a simmer, and let it reduce by about half. Pour yourself a glass while you wait.

4. Add the crushed tomatoes, tomato paste, chicken stock, seasonings, and the sausage back in. Bring this to a boil, then turn it to a simmer. Put a lid on it let it WORK FOR YOU for about 30 minutes or so.

5. Add in the cooked pasta. I used ditalini. You can use whatever you just want it to be on the smaller side. Stir in the spinach. Adjust your seasonings, pour it into bowls, and top it with parmesan.

Enjoy!

Xo,

K

  • Uncategorized

Coca Cola Pork Tacos

kathrynrahz's avatar kathrynrahz December 12, 2018

6A8905D2-8E3C-49F4-BFF2-74B53F0C93A2
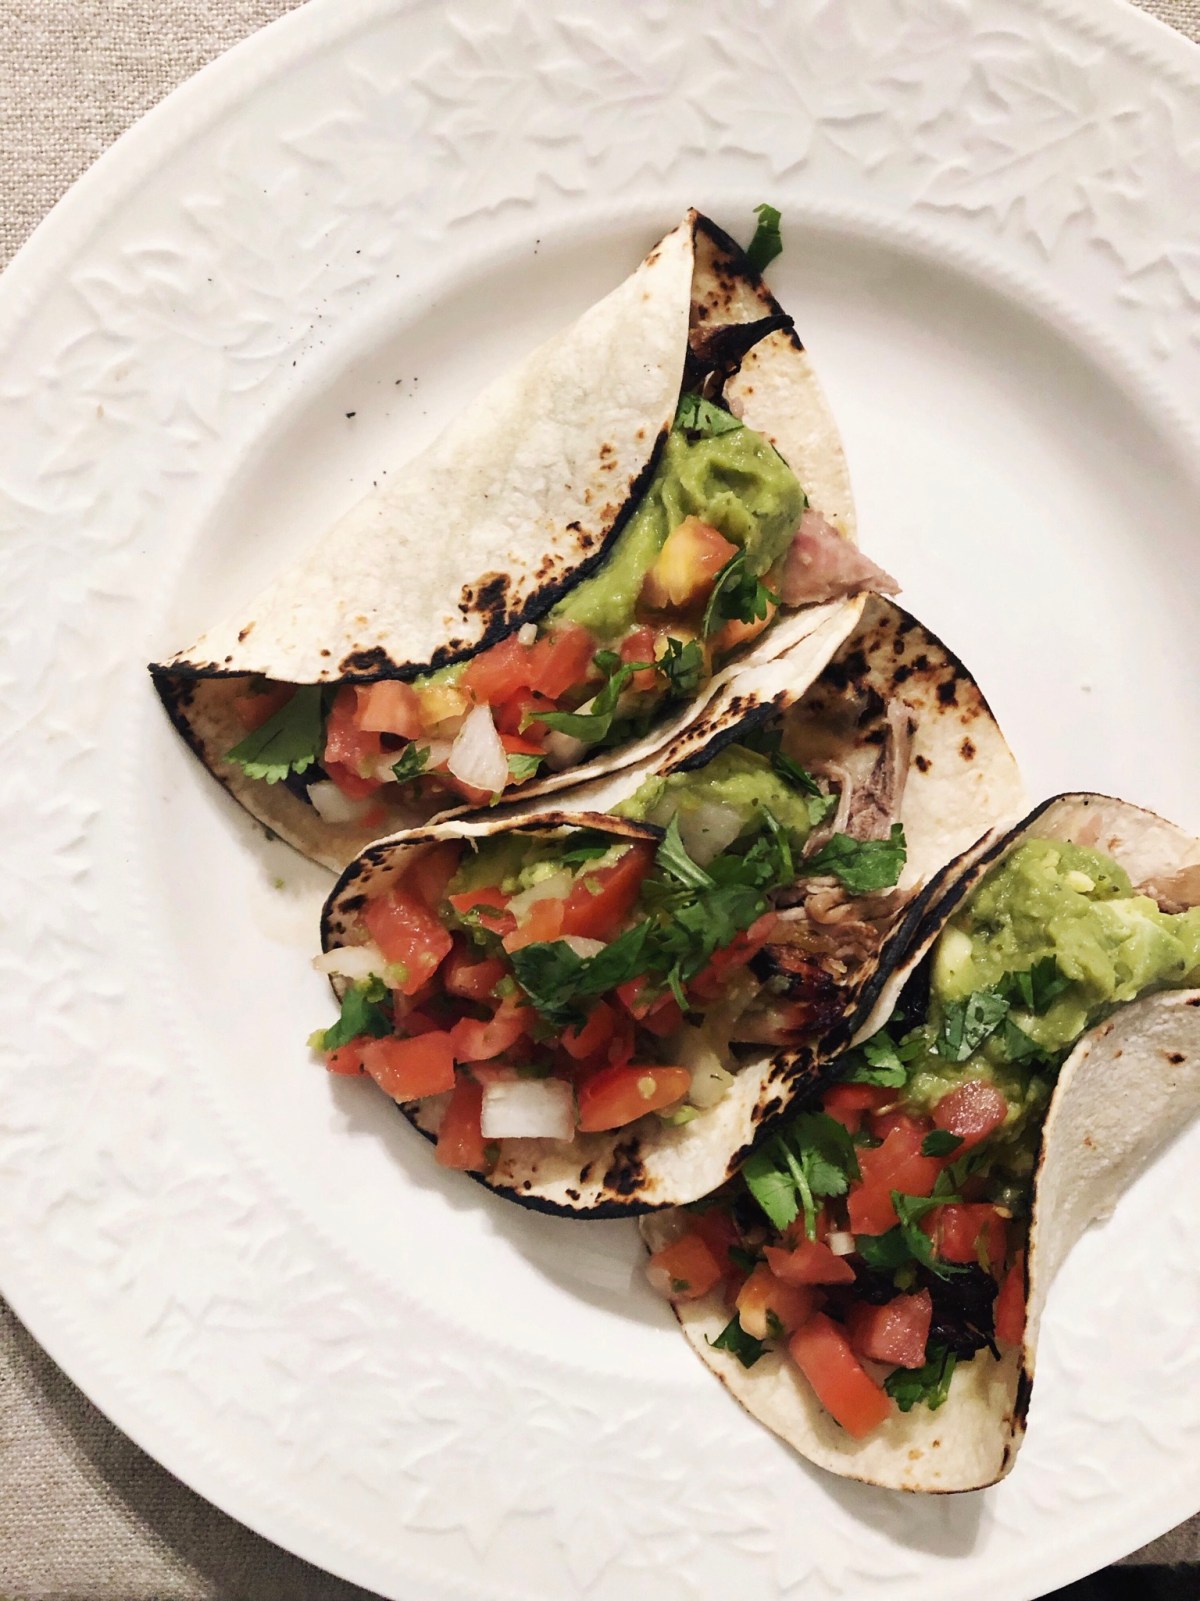
Show of hands for those of us that are here for Taco Tuesday? I LIVE FOR IT. My kids do too.

This recipe is no fail. It’s made with minimal ingredients, uses good old fashioned Coca Cola, and cooks in your slow cooker all day, giving you minimal work. If you want to get all precious with it and use your own homemade special spice blend that you made specifically for tacos using overpriced spices and the tears of angels then go ahead on your merry way. The rest of you are welcome at my table.


Ingredients:

One 3-5# pork butt. (It’s actually the shoulder, but technicalities).

One onion, diced

8 cloves garlic, minced

2 limes, juiced

2 oranges, juiced

1 Tbsp.  Oregano

1 Tbsp.  Cumin

3 Bay leaves

8 oz. Coca Cola

Salt and Pepper


Directions:

  1. Sear the sides of your pork butt. I have the word’s bougiest slow cooker, so I can sear it directly in the slow cooker, and then turn it to low. You can always just sear your meat in a dutch oven or cast iron skillet and then transfer it to your own peasant style crock pot.
  2. Add the rest of the ingredients to the slow cooker, turn it on low, and walk away. Make that slow cooker WORK FOR YOU.
  3. After around 7-8 hours, the meat should be falling apart. Remove it from the slow cooker, transfer it to a bowl, and shred it. Then put it onto a sheet pan with all of the juices from the slow cooker and stick it under a broiler until it gets nice and crispy. This is not the part that you want to skip, and I will remind you that there is no half stepping in the Rahz kitchen.
  4. Build your tacos. I like mine with guacamole, cilantro, and a squeeze of lime.
  5. Pour any leftover Coca Cola that you have into a tall glass with ice and enjoy your amazing Taco Tuesday.
  • Uncategorized

Pasta Carbonara

kathrynrahz's avatar kathrynrahz November 21, 2018

E9BD90FD-C79B-44A4-AAD9-88F5AF6C58DE
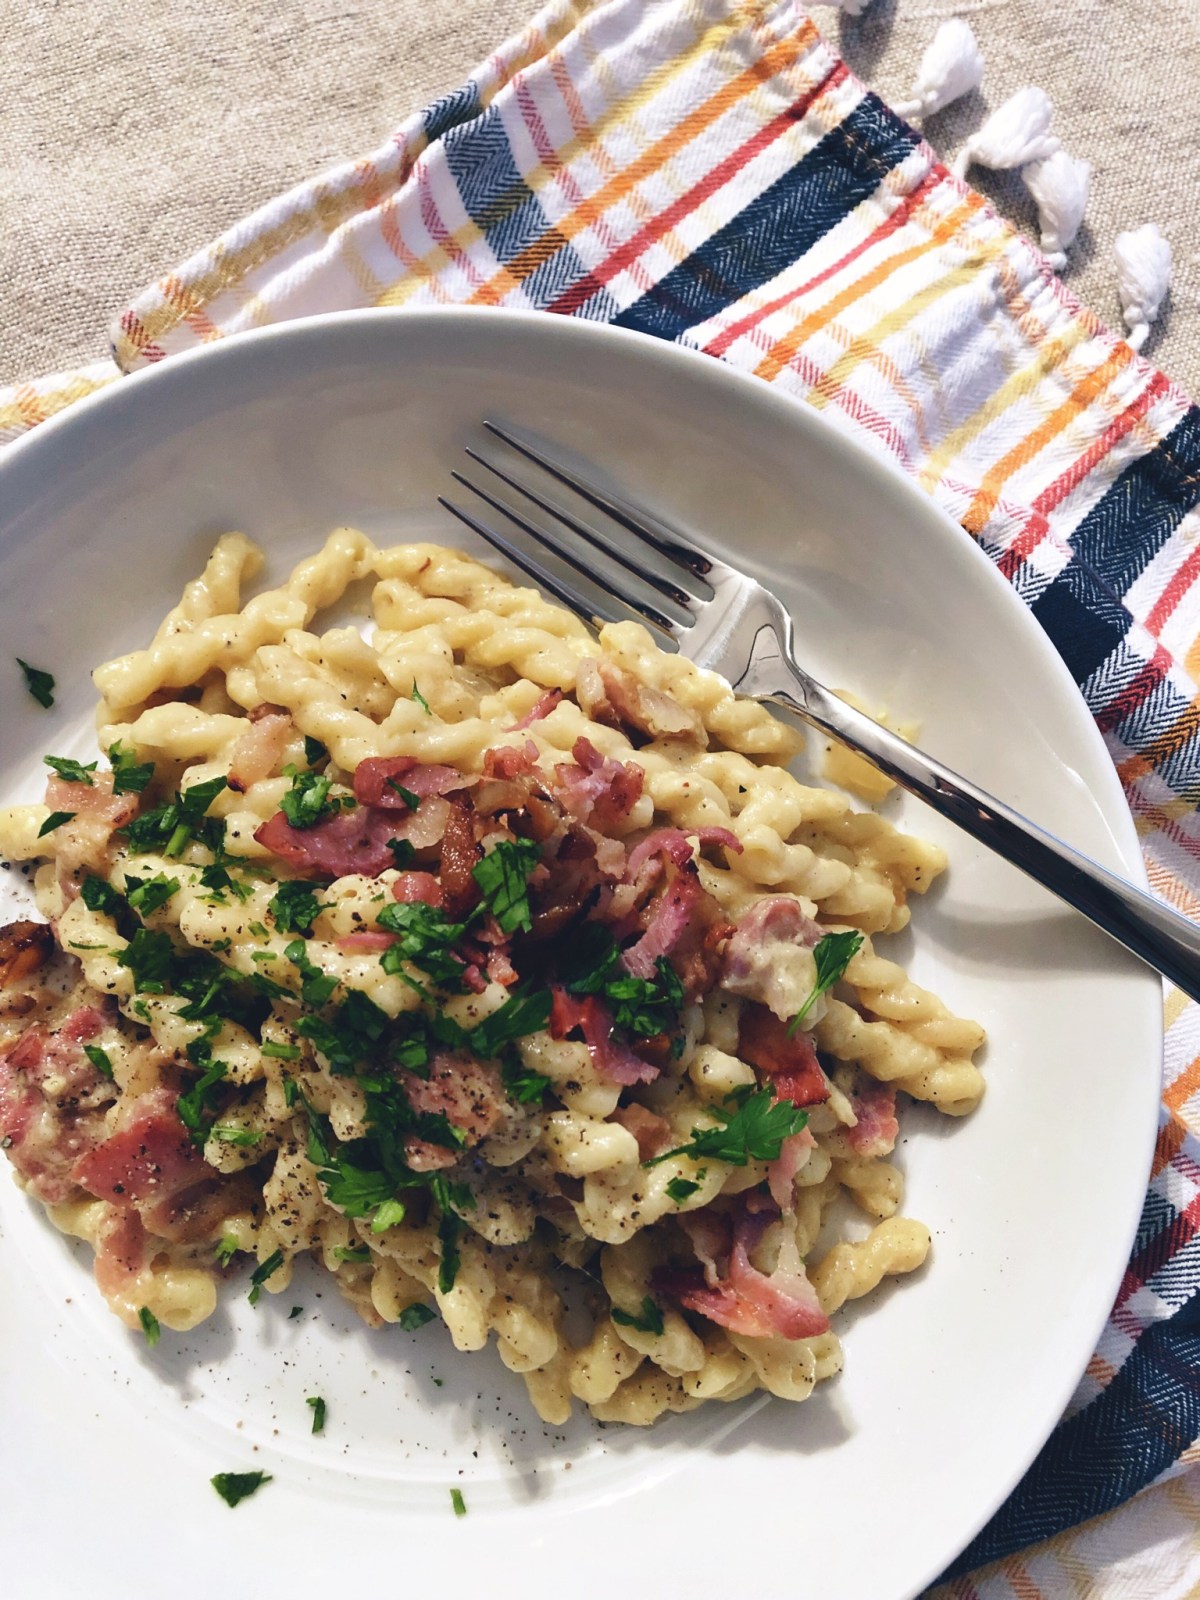
“Pasta alla carbonara is the Italian term that describes a pasta dish of spaghetti (or another pasta) with a sauce composed of cream, eggs, parmesan cheese, and bits of bacon. ”  – The Food Lover’s Companion (circa I don’t know when since my copy is old and very well loved).

First of all, BITS of bacon? I mean, who are we? Why would I bother putting bacon in something for only bits of it? I have absolutely zero chill when it comes to bacon. If you decide that only “bits” of bacon is good enough for you, please don’t come crying to me when your pasta is not up to par and you have sad feelings. Bless your heart.

Anyway, this is the pasta recipe I get asked most often for. And I fully believe that this recipe should be a part of your pasta lineup. You can have it completed from start to finish in 30 minutes (or less), and it’s delicious. Sometimes, simple really is better.

To kick things off proper I will start off with answers to some questions that have come up over the inquiries for the recipe: Can I make it with zucchini noodles? (NO), Can I use a cheese other than parmesan? (ABSOLUTELY NOT) , Can I use turkey bacon? (GOODBYE TO ALL OF THE FELICIAS).


Ingredients:

1 pound pasta

10 slices of bacon, chopped

1 medium onion, diced

4 eggs

6 tbsp. or so of heavy cream

1/3 cup parmesan

black pepper

parsley (for garnish)


Directions: 

  1. Bring a pot of salted water to a boil. Cook your pasta.
  2. Since a watched pot never boils, while you are waiting for your water to boil, drizzle a little olive oil in your dutch oven over medium heat. Add in your bacon and onion, and cook until the bacon begins to take some color. Your kitchen will begin to smell like Jesus’s kitchen at this point, and just ride that wave of glory while you complete the remaining steps.
  3. Now that you are a culinary genius and have two pots going on the stove top already, let’s go ahead and step up your game one more notch. Into a bowl, crack your four eggs, add in the heavy cream, the parmesan, and what looks like an irrational amount of black pepper. When your hand gets tired from turning your pepper mill, you have added enough. Whisk this all together.
  4. Once the bacon and onion mixture is done, you are going to scrape everything (grease and all) into the bowl with the egg mixture. I know the idea of adding hot bacon and onions to cracked eggs in a bowl sounds a little suspect,  but trust that I would never do you dirty like that. Mix it with a spatula and let it hang out together in the bowl until your pasta is al dente.
  5. Once your pasta is done, use a ladle and save about 1/2 cup of the boiling pasta water. Drain the pasta. Put the drained pasta and reserved water into the bowl with the eggs/cream/onions/bacon/parm and mix it briefly. Then, take a dinner plate that is big enough to cover the bowl, and cover it, and let it sit for about five minutes. What you are doing here is “just” cooking the eggs. You don’t want scrambled eggs here, so pay attention soldiers. You want a nice and silky sauce.
  6. After five minutes, remove the plate, and mix it all up. To serve, I usually crumble up some more cooked bacon and chopped parsley, and even more black pepper because I love myself.


  • Uncategorized

Grilled Cheese and Tomato Soup

kathrynrahz's avatar kathrynrahz November 18, 2018

E2201FF7-786B-4DC1-8AB0-6D208C730C95
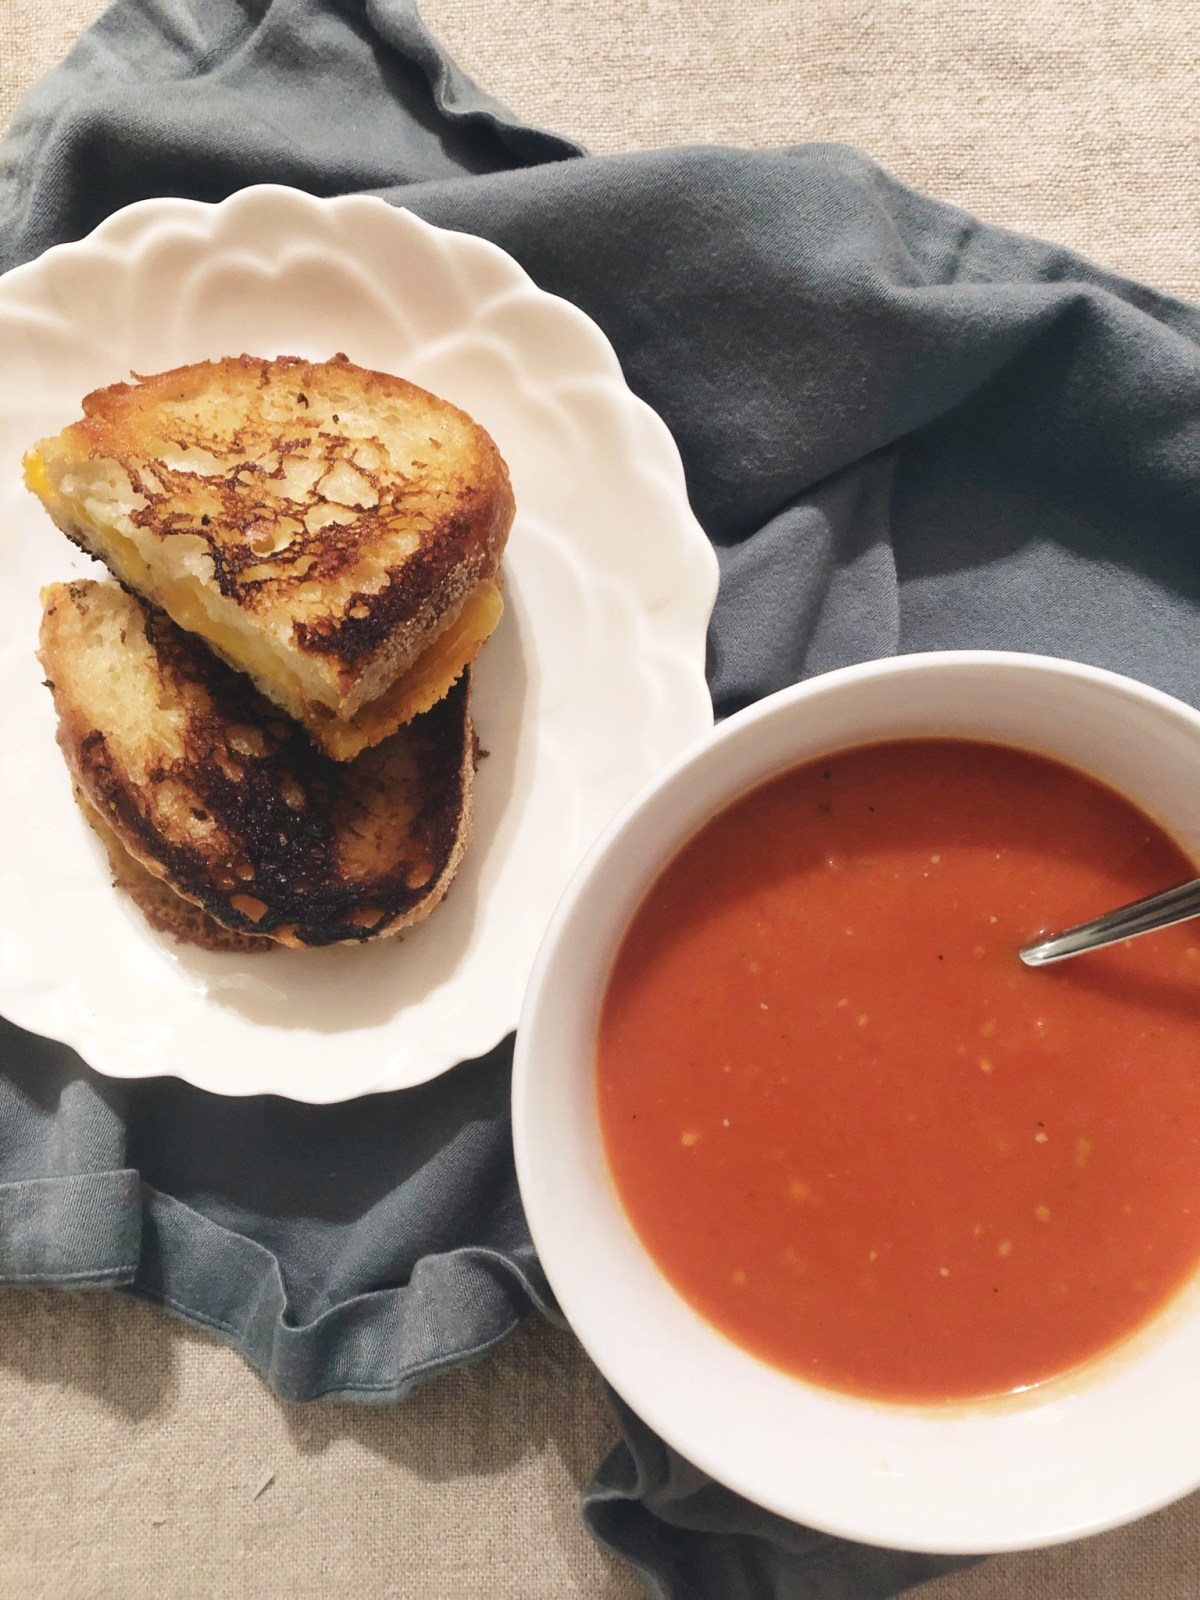
How old were you when you found out that using equal parts of butter and mayonnaise on the bread for your grilled cheese makes the best grilled cheese?

I was today years old.

Well, not necessarily today, but sometime in August when my September issue of Martha Stewart Living arrived. Yes, I still get the magazine delivered in print to my house every month, like the precious out of date person I can be sometimes.  Martha says that the butter gives the flavor, and the mayo gives the crunch. I was dying to test this out, and long story short, I have been making my grilled cheese like this ever since. Moral to the story? Martha will never do you wrong.

And now that you know the secret to perfect grilled cheese, you obviously need the perfect tomato soup to go along with it. This soup is easy. This soup is classic. This soup is the ultimate comfort. And in case you need reassurance, I will never do you wrong either.


For the soup:

2 tbsp. butter

2 tbsp. olive oil

2 small onions, chopped

6 cloves garlic, smashed

4 tbsp. flour

2  (28 oz.) cans whole, peeled tomatoes

4 cups (one box) chicken stock

basil

s&p


  1. Get the butter and olive oil going in your soup pot. I use my cast iron dutch oven always. (If you’ve seen my Instagram you can see that my cast iron is perfectly seasoned and has been very well loved. )
  2. Sauté your onions and garlic until they are soft and golden, about 6 minutes or so.  You will then add in the 4tbsp. of flour here. What you are doing is making a roux, so look at you go, all fancy and stuff now.
  3. Cook this for about a minute or so and then add in the tomatoes and chicken stock. Bring this to a boil. Once your soup is boiling, turn the heat down so that your soup is simmering. Drop your leaves of basil on top, put a lid on it, and let it do its thing for about 20 minutes or so. Make those tomatoes WORK FOR YOU, not the other way around here.
  4. Fish out the basil and discard it. Let the soup cool for just a little bit. What you need to do next is puree it. You can do this one of two ways, in batches in a blender, or keep it in the pot and use one of these. I have had mine since about 2004, it’s a great little investment, and I love it.
  5. Taste your soup and give it all the salt and pepper love it needs. I believe I have already shared my feelings on the proper seasoning of food so that your diners don’t have to, so I will spare you that rant today. HA, love me like I am or don’t love me at all.
  6. Make your grilled cheese however you like. I am a diehard fan of the sourdough bread and sharp cheddar cheese combo, because I think it just works. You can always use whatever you have on hand.  But trust me with the butter and mayo business, it’s THE BUSINESS.
  • Uncategorized

Brown Bag Apple Pie

kathrynrahz's avatar kathrynrahz November 15, 2018

5B9EFBB1-E3E8-49E6-B4ED-6A49F05D32DA
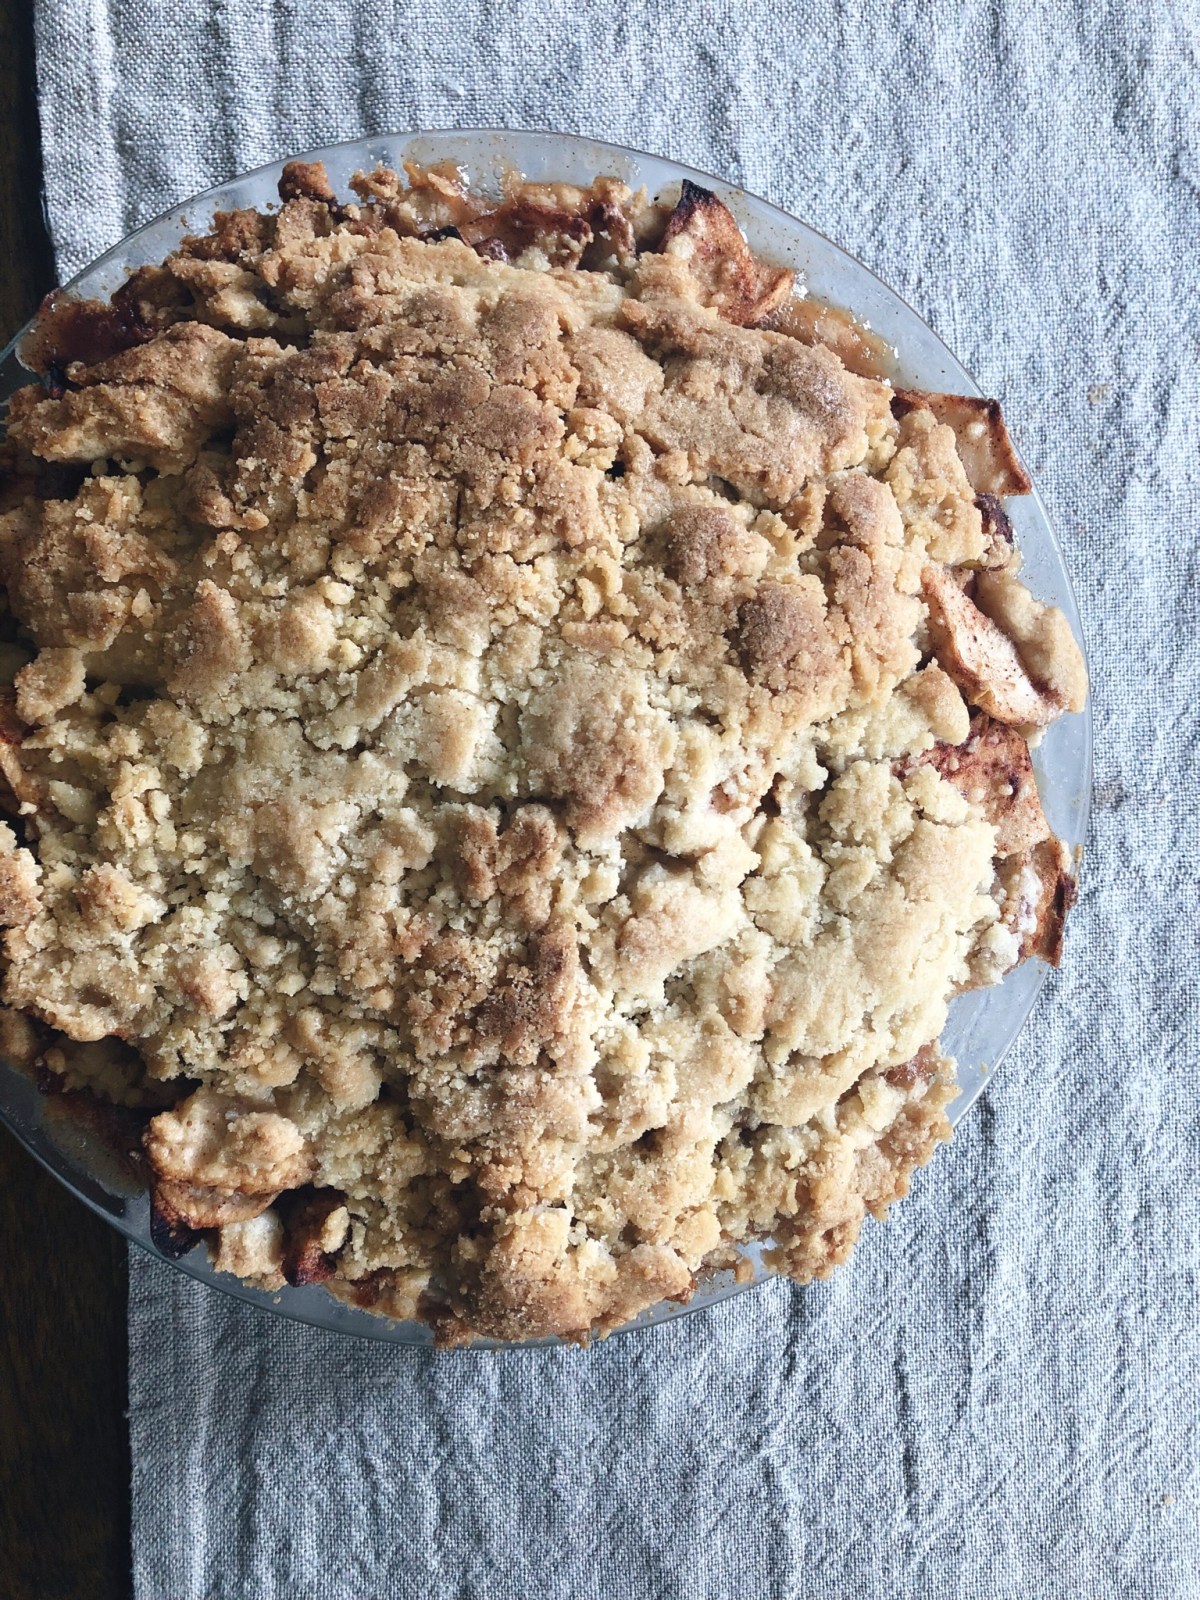
“Good apple pies are a considerable part of our domestic happiness.” ~ Jane Austen

Ain’t that the truth?

The thing is, I have a very strong pastry skill set. Cakes, pies, danish, and all sorts of things. When I was still working professionally in the culinary world, I was working under a World Champion pastry chef (from France).  Working under him I learned a lot of great things about food in general, and taking pride in the hard work that we did.

Today, as a full-time working, married mom of three, I still have that same respect for great food, and making pastries from scratch, and fancy, elaborately rolled out and decorated pie crusts. And selfishly,  it’s kind of nice to be the one person in your inner circle that can legitimately bake. But I also want to LIVE MY LIFE. So sometimes, simple and easy is the path to take.  So when I come across a recipe as simple as this one, I often want to discredit it, assuming that if it is that easy that even my husband any kitchen impaired person could make it, that there is no way that it can be good.

So scrolling through my Instagram feed one day, I saw A Life From Scratch bake a pie in a brown bag. WHAT? You mean that stack of Trader Joe’s bags that I have from forgetting to take in my own reusable bags like the delinquent I am can be used in a way like this? Like I don’t need to bust out all of my fancy pastry cutting tools and dirty up my pretty new quartz countertops rolling out pie shells to make a kick ass pie? Sign me up because that sounds nice.

Friends, I assure you that this is hands down my go to pie when I need to make a pie for dessert. It tastes like it takes much more work than this. And I will also leave you with this lesson from  Mr. World Champion pastry chef. Presentation is NOTHING if the flavor isn’t there first. So with that, get your granny smiths, your butter, and come with me on this journey of a homemade apple pie that is foolproof.

You are now a culinary hero.


Ingredients:

Bottom crust 

1.5 cups flour (all-purpose, please don’t overcomplicate this)

1 tsp. salt

2 tsp. sugar

1/2 cup vegetable oil

2 Tbsp. milk

Filling:

6 granny smith apples, peeled and sliced thin

1/2 cup sugar

2 Tbsp. flour

2.5 tsp. cinnamon

Top crust:

1 cup flour

1 cup sugar

1.5 sticks butter, softened


Directions:

  1. Mix the ingredients for the bottom crust together and press it into the bottom of your pie dish, as evenly as possible, and up the sides. I prefer a glass pie dish (because I’m fancy) but you can use whatever you’ve got.
  2. Peel and slice your granny smith apples. You do not need one of those fancy apple peeler/corer things to do this properly. Those are annoying, they break all of the time, and knife skills are an important skill to possess in the kitchen. I could go into another rant here, but I am on a new level today. And there is always tomorrow.  Moving along…toss those beautifully hand peeled and cut apples with the rest of the filling ingredients into a bowl, and then put them on top of the bottom crust. This may seem like an irrational amount of apples to you, but do you want a glorious pie or not?
  3. Mix the ingredients together for the top crust. This will at first look crumbly, then sticky. This means its perfect. Pat this mixture, in pieces, on top of that mountain of apples.
  4. Place this glorious creation into a brown paper bag, and fold it over to close it. Put it on a sheet pan, and put it into a 425 degree oven for about an hour. I swear to you this will not burn your house down. Keep a close eye if you are the paranoid type, but I assure you, I’ve made this multiple times without incident. Once you take it out of the oven, let it cool for a bit, and then you can take it out of its little brown paper bag cocoon. And when you do that, you will find the most beautiful crumb topped apple pie that is straight from the lord.org and you may even hear angels sing.  Or DJ Khaled, because all you do is win.

Posts pagination

Previous 1 2 3 Next
Blog at WordPress.com.
Beans+Rahz
Blog at WordPress.com.
  • Subscribe Subscribed
    • Beans+Rahz
    • Already have a WordPress.com account? Log in now.
    • Beans+Rahz
    • Subscribe Subscribed
    • Sign up
    • Log in
    • Report this content
    • View site in Reader
    • Manage subscriptions
    • Collapse this bar
 

Loading Comments...